All posts by admin

A Simple Walnut Bowl

A while back, very early in the new year, I rough-turned some walnut bowls from a tree that came down last summer. The rough bowls have been sitting for about 10 weeks, so I figured it was time to give it a whirl, so to speak. It’s a decent size bowl for my lathe, just under six inches.

A Simple Walnut Bowl
(Click photo to view larger on Flickr)

Here’s a short video I took of the original tree coming down last June:

video link: https://www.youtube.com/watch?v=aXK-601edH8

A Whirl of Turnings

(I don’t know what the collective noun for “turnings” is, or if there even is one, so I just made this up. A “whirl” of turnings sounds at least somewhat appropriate, I think.)

So I’ve been puttering about in the shop, as one does, gravitating towards the lathe and smaller projects (tiny little attention span). First up, and most recent, is this prototype of a bud vase, made from maple. I thought I’d test the process before I break out the fancy schmancy wood, although the understated elegance of maple is not misplaced here. I think it does need to be a wee bit taller though.

(Click any photo to view larger on Flickr)

Bud Vase

Before the bud vase, I made these three small (about four and a half inches) maple and walnut bowls. I laminated the maple and walnut boards, then cut them into three equal pieces to form the blanks. They’re not meant to be a matching set, I was trying out different thicknesses and shapes.

Three Small Maple Walnut Bowls

One of them, if you look very closely, contains the remains of a tiny drop of my DNA (a kind of signature?) I broke the cardinal rule: “Don’t get blood on the work piece!”

Lastly, and least recently, a trio of acrylic pens. I love the names of the acrylic blanks, despite being a bit of a pain to turn. Two of these are called “Harley Flame” and the other is “Licorice Allsorts”. They are “Streamline” pen kits.

Three Acrylic Pens

Not sure what’s next, but I do have a whole box of the test tubes, so expect more bud vases…

Arbour Day of Wreckoning

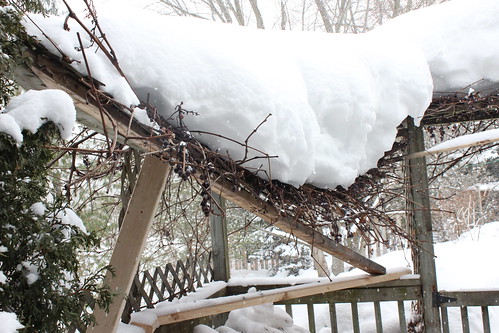
So far, the most serious casualty of this winter-that-never-ends, besides me achin’ back, is our grapevine arbour which covers, or covered, much of our little patio. There’s a fairly solid (I thought) portion over the barbecue, which I built a few years ago, and a hanging-by-a-thread section at the other end, which came with the house. We added a couple of 1×3’s across the gap this summer, to give the grapevine some extra places to go, to provide more shade.

Broken Arbour (1)
(Click photo to view larger on Flickr)

After an all-too-brief period of slightly above freezing temperatures a few days ago, the snow got rained on and then re-froze. The extra weight proved too much for our little arbour to bear. I’ve got a couple of 2×4’s wedged under it to keep it from collapsing altogether.

The main section (which I built) seen in the photo above, gave way at in the middle of a small span that normally would have been adequate. Except in my cleverness, I decided it needed lap joints in the middle and an extra beam running lengthwise. This was the fail point, and in retrospect was something of a design flaw.

Broken Arbour (2)
(Click photo to view larger on Flickr)

At the other end (seen in the second photo, above) we have the “legacy” portion of the coverage. It consisted of a diagonally-placed 2×4, just toe-nailed (later reinforced with a screw or two) into the posts, and a piece of lattice thrown up there. I’m actually surprised it lasted as long as it did. But we just couldn’t keep up with the snow squalls this year.

So, looks a spring project for me! I’m thinking, first of all, no lap joints in the middle of the span. Duh. Maybe go to 2×6. I was thinking about doing something with joist hangers, but I think that would be ugly, so I’m still mulling it over. Having to build it UNDER the existing grapevine was one of the main challenges last time, so I’ll see if I can figure out a way to make that easier. And I think we want full coverage over the whole patio this time. And because of that, it should be a bit higher for more headroom. Even so, the grapes hang down through the cracks, so you have to be careful!

Blue Tape and Sharpies

In the wood shop, blue tape has a million uses. Yes, literally a million. One of these is to make a quick list of things I need to pick up next time I’m at Home Despot. I tape it to the wall in a handy location so it stays in my mind (with luck) and is ready for additions. Sometimes on wood I’ll use blue tape to layout hole or joinery locations. And pencil is very hard to read on blue tape, so I usually use a Sharpie. So yeah, sometimes I make a shopping list using blue tape and Sharpies, reminding me to pick up blue tape and Sharpies.

Blue Tape and Sharpies

(click to view larger on Flickr, if you think that’s really necessary in this case)

Tiny Walnut Bowl

Back in the shop today after a lazy January …plus a lazy first week or so of February… seems to happen that way every year… I decided to try something with some chunks of a walnut tree that was harvested last summer.

Small Walnut Bowl
Click to view larger on Flickr

Those are mints, not eggs, by the way. This bowl is about 2 inches in diameter, by about 2 and a half inches tall, and would probably hold ONE egg just nicely. I’m pushing the process a little, in that the walnut was only cut 6-8 months ago. I rough-turned three bowls from the same wood not too long ago, and put them away for another 6 months or so, but I thought I’d go ahead with some small turnings, just to see how it would work out. I think it’s small enough that nothing too dramatic will happen as it finishes drying. Time will tell, as it does.

Be It Ever So Humbling…

So here are some photos of what I’ve been working on for the last couple of weeks in the Barkwhistle Wood Shop:


Yeah, pretty much nothing. January doldrums, or something. I say “pretty much” nothing because technically, there was something. I thought I would make a little caddy to hold my various replacement carbide cutter heads in their little packages, sorted into each type, to replace the empty yogurt container I have been using for that purpose. Just a simple plywood and hardboard thingy, but with small rabbets and dadoes to keep everything lined up and to hone my skills.

Should be no big deal for a maker of fine jewelry boxes such as myself, right? “Wrong again, Bob!

I don’t know exactly what went wrong, but let’s just say there will be no photos. Probably. My little interior dividers were so out of alignment the first time that I had to start them over. Still not perfect, but enough is enough. It’s just a stupid little shop project, so I probably didn’t slow down enough to finesse the details the way you need to with any joinery. Like the title says, a humbling (and frustrating) project.

I think I will just putty up the excess gaps in the enlarged-into-alignment dadoes and spray paint the whole thing orange. THEN I might post a picture…

Walnut Bowl In Progress

I thought I would kick off the new year by starting in on one of the chunks of black walnut that came my way during the summer. At that time, we chunked it up into manageable pieces with the chain saw. I then took one of those pieces and got four small slabs out of it, each about 8 inches square by about 4 inches thick.

Walnut Bowl In Progress (1)
(click photos to view larger on Flickr)

Today I took one of those small slabs, drew a circle on it and cut it roughly to that circle shape on the bandsaw. Next I screwed on a mounting plate and turned it to round, adding a small tenon on what will be the bottom of the bowl. I chucked up the tenon, then removed the mounting plate and reversed the bowl, hollowing out the interior.

Walnut Bowl In Progress (2)

I took it deep enough to leave about an inch at the bottom, not counting the tenon, and about 3/4 of an inch on the sides. This is as far as I will take it for now. I wrote the date on the tenon (this part will not be on the final bowl) and marked the location of the #1 chuck jaw, so I can get it as close as possible to running true the next time I mount it. The next step is to re-coat the piece with the same wax coating it had six months ago, then wait another six months before finishing the turning.

This long time-frame is a challenge for my tiny attention span, but I’ll turn some pens or something in between to keep myself amused.

Three Stoppers

Just a quick inventory shot of the only three wine stoppers I have left…. better get busy, people need to stopper their wine…

Three Stoppers
(click photo to view larger on Flickr)

The little gearshift stoppers are adorable. I’m down to the last one now, which surprised me until I remembered that I pulled one out to keep for ourselves. NOTE: resist the urge to shift gears while it’s in the bottle!

Pens and Stoppers and Pens (Oh My)

Some recent small turnings from the Barkwhistle Wood Shop (i.e. me):
Pens and Stoppers and Pens
(click photo to view larger on Flickr)

From left to right: Three Sedona rollerball pens in Stabilized Black Box Elder Burl with a Black Titanium finish; two Nouveau Bottle Stoppers in “Licorice Allsorts” acrylic with a chrome finish; and three Stratus ballpoint pens with a gun metal finish, one is purpleheart, the other two are “Midnight Forest” acrylic.

We’ve seen the stoppers before in an earlier post, but they are presented here again because all of these (except for one of the rollerballs) are soon to be shipped off to another (hopefully) happy customer.

I LOVE rollerball pens, and have landed on these Sedona’s as my favourite style. Each of the three shown here is made from a single piece of Box Elder Burl, as noted. They are “stabilized” with resins to add colour and make them smoother and more consistent to the touch, important for pens. Between the swirly burl wood and the injected resins, no two are alike and they can be full of surprises. In the case of the one on the far left, the top half and the bottom half turned out to be quite different in overall colour. You can see where the bottom colour extends into the cap a little bit, but if I didn’t know better, if I hadn’t cut and prepped the original blank myself, I’d almost think they came from two different pieces. Whether this is a feature or a bug is a matter of individual preference I guess. I kind of like it, but I would say that…

Myrtle Bowl

Here’s a bowl I just finished turning, made from a wood called Myrtle, probably the North American version. (There’s also a Tasmanian myrtlewood, apparently).

(Click photos to view larger on Flickr)
Myrtle Bowl

It’s a decent looking wood, but I did have some issues with it being a bit tear-out prone. In fact there are a couple of spots I just couldn’t get perfectly smooth, despite a brand new carbide blade and lots of sanding. Not sure I should blame the wood, but I will anyway, at least rhetorically.

Myrtle Bowl

I am happy with the overall shape. Once again, I could have gone a bit thinner in the walls, but I’m sneaking up on that goal, one bowl at a time.